SAML vs OIDC vs OAuth2: Which Protocol Handles Which Identity Problem

Reading Time: 6 minutes

The Identity Stack, Episode 10
EP09: Active DirectoryEP10EP11: Identity Providers → …


TL;DR

  • SAML 2.0 is a federation protocol for browser-based SSO — an IdP issues a signed XML assertion that a Service Provider trusts; designed for enterprise applications
  • OAuth2 is an authorization delegation protocol, not authentication — it lets an application act on your behalf without knowing your password; the access token says what, not who
  • OIDC (OpenID Connect) = OAuth2 + an identity layer — adds the id_token (a JWT containing who you are) on top of OAuth2’s access_token (what you can do)
  • SAML vs OIDC: SAML is XML, enterprise-native, stateful; OIDC is JSON/JWT, API-native, stateless — new applications almost always use OIDC
  • The id_token is a JWT — decode it at jwt.io and read every claim — it tells you exactly what the IdP asserts about the user
  • The browser SSO flow is three redirects: user → SP → IdP (authenticate) → SP (consume assertion)

The Problem: LDAP and Kerberos Don’t Cross the Internet

EP09 showed how authentication works inside a corporate network. LDAP and Kerberos both assume network proximity to the directory server — firewall-friendly ports don’t help when the authentication protocol requires a direct connection to the KDC or directory.

Internal network: works
  Browser → intranet app → LDAP/Kerberos → AD DC (all on 10.0.0.0/8)

Internet: breaks
  Browser → SaaS app (AWS) → LDAP/Kerberos → AD DC (on-prem behind firewall)
  ✗ KDC not reachable across NAT
  ✗ LDAP not exposed to internet (shouldn't be)
  ✗ Every SaaS app can't have its own LDAP connection to your DC

SAML was invented in 2002 to solve this. OIDC in 2014. Both let identity assertions travel over HTTPS — the one protocol that crosses every firewall.


SAML 2.0: Enterprise Browser SSO

SAML 2.0 has three actors: the User, the Identity Provider (IdP), and the Service Provider (SP).

1. User visits SP (e.g., Salesforce)
   SP: "I don't know this user — send them to the IdP"
   ↓  HTTP redirect with SAMLRequest (base64-encoded AuthnRequest)

2. User arrives at IdP (e.g., Okta, AD FS, Entra ID)
   IdP: "Authenticate me" → user enters credentials
   IdP: generates a signed SAML Assertion (XML)
   ↓  HTTP POST to SP's Assertion Consumer Service (ACS) URL

3. SP receives the SAMLResponse
   SP: verifies the signature using IdP's public key
   SP: extracts user attributes from the Assertion
   SP: creates a session — user is logged in

The SAML Assertion is an XML document signed by the IdP. It contains:

<saml:Assertion>
  <saml:Issuer>https://idp.corp.com</saml:Issuer>
  <saml:Subject>
    <saml:NameID Format="urn:oasis:names:tc:SAML:1.1:nameid-format:emailAddress">
      [email protected]
    </saml:NameID>
  </saml:Subject>
  <saml:Conditions
    NotBefore="2026-04-27T01:00:00Z"
    NotOnOrAfter="2026-04-27T01:05:00Z">  ← short-lived: replay protection
  </saml:Conditions>
  <saml:AttributeStatement>
    <saml:Attribute Name="email">
      <saml:AttributeValue>[email protected]</saml:AttributeValue>
    </saml:Attribute>
    <saml:Attribute Name="groups">
      <saml:AttributeValue>engineers</saml:AttributeValue>
      <saml:AttributeValue>sre-team</saml:AttributeValue>
    </saml:Attribute>
  </saml:AttributeStatement>
</saml:Assertion>

The SP trusts the assertion because it’s signed with the IdP’s private key, and the SP has the IdP’s public certificate configured. No direct connection between SP and IdP needed during authentication — only the browser carries the assertion.

SP-initiated vs IdP-initiated:
– SP-initiated: user visits the SP, gets redirected to IdP, authenticates, redirected back — the common flow
– IdP-initiated: user starts at the IdP (e.g., company portal), clicks an app, IdP sends assertion directly — simpler but no SP-generated RequestID, so the SP can’t verify the request was expected (a security concern)


OAuth2: Authorization Delegation (Not Authentication)

This distinction is important and consistently confused: OAuth2 is for authorization, not authentication.

OAuth2 solves: “I want to let GitHub Actions post to my Slack without giving GitHub my Slack password.”

Resource Owner (you)  → grants permission to →  Client (GitHub Actions)
                                                        │
                                                        │ access_token
                                                        ▼
                                               Resource Server (Slack API)
                                               "this token can post messages"

The access_token answers “what can this client do?” not “who is this user?” A resource server receiving an access token knows the token is valid and what scopes it carries — it does not necessarily know which human authorized it.

The four OAuth2 grant types:

Grant Use case
Authorization Code Web apps (server-side) — most secure, recommended
PKCE (+ Auth Code) Native/SPA apps — Auth Code without client secret
Client Credentials Machine-to-machine (no user) — service accounts
Device Code Devices without browsers (smart TVs, CLIs)

The Implicit grant (tokens in URL fragment) is deprecated. Don’t use it.


OIDC: OAuth2 + Who You Are

OpenID Connect adds identity to OAuth2 by adding the id_token — a JWT that the IdP signs and that contains claims about the authenticated user.

Authorization Code flow with OIDC:

1. Client redirects user to IdP:
   GET /authorize?
     response_type=code
     &client_id=myapp
     &scope=openid email profile    ← "openid" scope triggers OIDC
     &redirect_uri=https://app.com/callback
     &state=random-nonce

2. IdP authenticates user, returns:
   GET /callback?code=AUTH_CODE&state=random-nonce

3. Client exchanges code for tokens:
   POST /token
   grant_type=authorization_code&code=AUTH_CODE...

4. IdP returns:
   {
     "access_token": "eyJ...",    ← what the user authorized
     "id_token": "eyJ...",        ← who the user is (JWT)
     "token_type": "Bearer",
     "expires_in": 3600
   }

The id_token decoded:

{
  "iss": "https://idp.corp.com",          ← issuer (the IdP)
  "sub": "user-guid-12345",               ← subject (stable user identifier)
  "aud": "myapp",                          ← audience (your client_id)
  "exp": 1745730000,                       ← expiry (Unix timestamp)
  "iat": 1745726400,                       ← issued at
  "email": "[email protected]",
  "name": "Vamshi Krishna",
  "groups": ["engineers", "sre-team"]     ← custom claims from IdP
}
# Decode any JWT at the command line (no verification — for debugging only)
echo "eyJ..." | cut -d. -f2 | base64 -d 2>/dev/null | python3 -m json.tool

# Or: jwt.io — paste the token, read every claim

sub is the stable user identifier. Email addresses change. Names change. The sub claim is the IdP’s internal identifier for the user — use it as the primary key when storing user data. Never store email as the primary key.


SAML vs OIDC: When to Use Which

SAML 2.0 OIDC
Format XML JSON / JWT
Transport HTTP POST (browser only) HTTP redirect + JSON API
Age 2002 2014
Enterprise adoption Very high (AD FS, Okta, Entra ID) Very high (newer apps)
API-friendly No Yes
Mobile apps No Yes
Complexity High (XML, schemas, signatures) Medium (JWT, JSON)
Single Logout Specified (rarely works well) Optional, inconsistent

Use SAML when: You’re integrating with an enterprise SaaS that only supports SAML (Salesforce classic, legacy HR systems), or your IdP team mandates it.

Use OIDC when: You’re building a new application, integrating with a modern IdP, or need API-based token validation. OIDC is the default for everything new.

Use OAuth2 (Client Credentials) when: Service-to-service authentication with no user — your CI/CD pipeline authenticating to an API, your microservice calling another microservice.


A Complete Browser SSO Flow (OIDC)

1. User visits https://app.corp.com (not logged in)
   App: no session → redirect to IdP

2. GET https://idp.corp.com/authorize?
        response_type=code
        &client_id=app-corp
        &scope=openid email
        &redirect_uri=https://app.corp.com/callback
        &state=abc123
        &nonce=xyz789

3. IdP: user is not authenticated → show login form
   User: enters [email protected] + password
   (or: IdP sees existing session cookie → skip login)

4. IdP: authentication success
   Redirect: GET https://app.corp.com/callback?code=AUTH_CODE&state=abc123

5. App (server-side): validate state=abc123 (CSRF protection)
   POST https://idp.corp.com/token
     grant_type=authorization_code
     &code=AUTH_CODE
     &client_id=app-corp
     &client_secret=SECRET
     &redirect_uri=https://app.corp.com/callback

6. IdP responds:
   { "id_token": "JWT...", "access_token": "JWT...", "expires_in": 3600 }

7. App: validate id_token signature (using IdP's JWKS endpoint)
   App: extract sub, email, groups from id_token
   App: create session for [email protected]
   App: redirect user to original destination

Step 7 is where most bugs live. The app must validate: signature (using IdP’s public keys from /.well-known/jwks.json), iss (matches the expected IdP), aud (matches the client_id), exp (not expired), and nonce (matches what was sent in step 2). Skip any of these and you have an authentication bypass.


⚠ Common Misconceptions

“OAuth2 is for login.” OAuth2 is for authorization delegation. It can be used as a login mechanism only when OIDC (the openid scope + id_token) is added on top. “Login with Google” uses OIDC, not bare OAuth2.

“JWTs are encrypted.” By default, JWTs are signed (JWS), not encrypted. The header and payload are base64url-encoded — anyone can decode them. Encryption (JWE) is a separate, less commonly used spec. Never put secrets in a JWT payload assuming it’s private.

“SAML Single Logout works reliably.” SAML SLO is specified but inconsistently implemented. Many SPs ignore SLO requests or don’t propagate them correctly. Don’t depend on SLO for security — session revocation requires additional mechanisms (short-lived tokens, token introspection, session registries).


Framework Alignment

Domain Relevance
CISSP Domain 5: Identity and Access Management SAML, OAuth2, and OIDC are the three protocols that enable federated identity and SSO — understanding which does what is foundational to modern IAM design
CISSP Domain 4: Communications and Network Security JWT validation (signature, claims, expiry) is a network security control — failing to validate any claim is an authentication bypass vulnerability
CISSP Domain 3: Security Architecture and Engineering The choice of SAML vs OIDC is an architectural decision that affects every application integration, mobile support, and API design

Key Takeaways

  • SAML 2.0: XML-based browser SSO — three redirects, signed assertion, enterprise legacy apps
  • OAuth2: authorization delegation — access tokens grant scopes, not identity
  • OIDC: OAuth2 + id_token — adds who the user is on top of what they can do
  • sub is the stable user identifier in OIDC — never use email as a primary key
  • JWT validation must check: signature, iss, aud, exp, nonce — missing any is a security bypass
  • New applications: OIDC. Legacy enterprise SaaS: SAML. Service-to-service: OAuth2 Client Credentials

What’s Next

EP10 covered the protocols. EP11 covers the systems that implement them — the identity providers: what Okta, Entra ID, Keycloak, and AD FS actually do, how they federate with each other, and how SCIM handles user provisioning separately from authentication.

Next: Identity Providers Explained: On-Prem, Cloud, SCIM, and Federation

Get EP11 in your inbox when it publishes → linuxcent.com/subscribe
How Active Directory Works: LDAP, Kerberos, and Group Policy Under the Hood

Reading Time: 6 minutes

The Identity Stack, Episode 9
EP08: FreeIPAEP09EP10: SAML/OIDC → …


TL;DR

  • Active Directory is not a product that happens to use LDAP — it is an LDAP directory with a Microsoft-extended schema, a built-in Kerberos KDC, and DNS tightly integrated
  • Replication uses USNs (Update Sequence Numbers) and GUIDs — the Knowledge Consistency Checker (KCC) automatically builds the replication topology
  • Sites and site links tell AD which DCs are physically close — AD prefers to authenticate users against a DC in the same site to minimize WAN latency
  • Group Policy Objects (GPOs) are stored as LDAP entries (in the CN=Policies container) and Sysvol files — LDAP tells clients which GPOs apply; Sysvol delivers the policy files
  • Linux joins AD via realm join (uses adcli + SSSD) or net ads join (Samba + winbind) — both register a machine account in AD and get a Kerberos keytab
  • The difference between Linux in AD and Linux in FreeIPA: AD is optimized for Windows; FreeIPA is optimized for Linux — both interoperate

The Big Picture: What AD Actually Is

Active Directory Domain: corp.com
┌────────────────────────────────────────────────────────────┐
│                                                            │
│  LDAP directory          Kerberos KDC                      │
│  ─────────────           ──────────                        │
│  Schema: 1000+ classes   Realm: CORP.COM                   │
│  Objects: users, groups, Issues TGTs + service tickets     │
│  computers, GPOs, OUs    Uses LDAP as the account DB       │
│                                                            │
│  DNS                     Sysvol (DFS share)                │
│  ────                    ────────────────                  │
│  SRV records for KDC     GPO templates                     │
│  and LDAP discovery      Login scripts                     │
│                          Replicated via DFSR               │
│                                                            │
│  Replication engine: USN + GUID + KCC                      │
└────────────────────────────────────────────────────────────┘
          │ replicates to          │ replicates to
          ▼                        ▼
   DC: dc02.corp.com        DC: dc03.corp.com

EP08 showed FreeIPA as the Linux-native answer to enterprise identity. AD is the Microsoft answer — and because most enterprises run Windows clients, understanding AD is unavoidable for Linux infrastructure engineers. This episode goes behind the LDAP and Kerberos protocols to explain what makes AD specifically work.


The AD Schema: LDAP With 1000+ Object Classes

AD’s schema extends the base LDAP schema with Microsoft-specific classes and attributes. Every user object is a user class (which extends organizationalPerson which extends person which extends top) with additional attributes like:

sAMAccountName   ← the pre-Windows 2000 login name (vamshi)
userPrincipalName ← the modern UPN ([email protected])
objectGUID       ← a globally unique 128-bit identifier (never changes, even if DN changes)
objectSid        ← Windows Security Identifier (used for ACL enforcement on Windows)
whenCreated      ← creation timestamp
pwdLastSet       ← password change timestamp
userAccountControl ← bitmask: disabled, locked, password never expires, etc.
memberOf         ← back-link: groups this user belongs to

objectGUID is the authoritative identifier in AD — not the DN. When a user is renamed or moved to a different OU, the GUID stays the same. Applications that store a user’s DN will break on rename; applications that store the GUID won’t.

userAccountControl is the bitmask that controls account state:

Flag          Value   Meaning
ACCOUNTDISABLE  2     Account disabled
LOCKOUT         16    Account locked out
PASSWD_NOTREQD  32    Password not required
NORMAL_ACCOUNT  512   Normal user account (set on almost all accounts)
DONT_EXPIRE_PASSWD 65536  Password never expires
# Query AD from a Linux machine
ldapsearch -x -H ldap://dc.corp.com \
  -D "[email protected]" -w password \
  -b "dc=corp,dc=com" \
  "(sAMAccountName=vamshi)" \
  sAMAccountName userPrincipalName objectGUID memberOf userAccountControl

Replication: USN + GUID + KCC

AD replication is multi-master — every DC accepts writes. The replication engine uses:

USN (Update Sequence Number) — a per-DC counter that increments on every local write. Each attribute in the directory stores the USN at which it was last modified (uSNChanged, uSNCreated). When DC-A replicates to DC-B, DC-B asks: “give me everything you’ve changed since the last USN I saw from you.”

GUID — each object has a globally unique identifier. If the same attribute is modified on two DCs before replication (a conflict), the conflict is resolved: last-writer-wins at the attribute level, based on the modification timestamp. If timestamps are equal, the attribute value from the DC with the lexicographically higher GUID wins.

KCC (Knowledge Consistency Checker) — a component that runs on every DC and automatically constructs the replication topology. You don’t configure which DCs replicate to which — the KCC builds a minimum spanning tree that ensures every DC is connected to every other within a set number of hops. You configure Sites and site links; the KCC does the rest.

# Check replication status from a Linux machine (requires rpcclient or adcli)
# Or on the DC: repadmin /showrepl (Windows tool)

# Simulate: query the highestCommittedUSN from a DC
ldapsearch -x -H ldap://dc.corp.com \
  -D "[email protected]" -w password \
  -b "" -s base highestCommittedUSN

Sites are AD’s concept of physical network topology. A site is a set of IP subnets with high-bandwidth connectivity between them. Site links represent the WAN connections between sites.

Site: Mumbai              Site: Hyderabad
┌────────────────┐        ┌────────────────┐
│ DC: dc-mum-01  │        │ DC: dc-hyd-01  │
│ DC: dc-mum-02  │        │ DC: dc-hyd-02  │
│ subnet: 10.1/16│        │ subnet: 10.2/16│
└───────┬────────┘        └────────┬───────┘
        │                          │
        └──── Site Link ───────────┘
              Cost: 100
              Replication interval: 15 min

When a user in Mumbai authenticates, AD’s KDC locates a DC in the same site using DNS SRV records. The SRV records include the site name in the service name: _ldap._tcp.Mumbai._sites.dc._msdcs.corp.com. SSSD and Windows clients query site-local SRV records first.

If no DC is available in the local site, authentication falls back to a DC in another site across the WAN link. Configuring sites correctly prevents remote authentication failures from killing local operations.


Group Policy: LDAP + Sysvol

GPOs are stored in two places:

LDAP — the CN=Policies,CN=System,DC=corp,DC=com container holds GPO metadata objects. Each GPO has a GUID, a display name, and version numbers. The gPLink attribute on OUs and the domain root links GPOs to where they apply.

Sysvol — the actual policy templates and scripts live in \\corp.com\SYSVOL\corp.com\Policies\{GPO-GUID}\. Sysvol is a DFS-R (Distributed File System Replication) share replicated to every DC.

When a Windows client applies Group Policy:
1. LDAP query: what GPOs are linked to my OU chain?
2. Sysvol fetch: download the policy templates from the GPO’s Sysvol path
3. Apply: process Registry settings, Security settings, Scripts

Linux clients don’t process GPOs natively. The adcli and sssd tools interpret a small subset of AD policy (password policy, account lockout) via LDAP. Full GPO processing on Linux requires Samba’s samba-gpupdate or third-party tools.


Joining Linux to AD

# Install required packages
dnf install -y realmd sssd adcli samba-common

# Discover the domain
realm discover corp.com
# corp.com
#   type: kerberos
#   realm-name: CORP.COM
#   domain-name: corp.com
#   configured: no
#   server-software: active-directory
#   client-software: sssd

# Join
realm join corp.com -U Administrator
# Prompts for Administrator password
# Creates machine account in AD
# Configures sssd.conf, krb5.conf, nsswitch.conf, pam.d automatically

# Verify
realm list
id [email protected]

What the join does:

  1. Creates a machine account HOSTNAME$ in CN=Computers,DC=corp,DC=com
  2. Sets a machine password (rotated automatically by SSSD)
  3. Retrieves a Kerberos keytab to /etc/krb5.keytab
  4. Configures SSSD with id_provider = ad, auth_provider = ad
  5. Updates /etc/nsswitch.conf to include sss
  6. Updates /etc/pam.d/ to include pam_sss

After joining, SSSD uses the machine’s Kerberos keytab to authenticate to the DC and query LDAP — no hardcoded service account credentials required.


LDAP Queries Against AD from Linux

# Find a user (after kinit or with -w password)
ldapsearch -Y GSSAPI -H ldap://dc.corp.com \
  -b "dc=corp,dc=com" \
  "(sAMAccountName=vamshi)" \
  sAMAccountName mail memberOf

# Find all members of a group
ldapsearch -Y GSSAPI -H ldap://dc.corp.com \
  -b "dc=corp,dc=com" \
  "(cn=engineers)" \
  member

# Find all AD-joined Linux machines
ldapsearch -Y GSSAPI -H ldap://dc.corp.com \
  -b "dc=corp,dc=com" \
  "(&(objectClass=computer)(operatingSystem=*Linux*))" \
  cn operatingSystem lastLogonTimestamp

# Find disabled accounts
ldapsearch -Y GSSAPI -H ldap://dc.corp.com \
  -b "dc=corp,dc=com" \
  "(userAccountControl:1.2.840.113556.1.4.803:=2)" \
  sAMAccountName

The last filter uses an LDAP extensible match (1.2.840.113556.1.4.803 is the OID for bitwise AND). userAccountControl:1.2.840.113556.1.4.803:=2 means “entries where userAccountControl AND 2 equals 2” — i.e., the ACCOUNTDISABLE bit is set. This is a Microsoft AD extension not in standard LDAP.


⚠ Common Misconceptions

“AD is just Microsoft’s LDAP.” AD is LDAP + Kerberos + DNS + DFS-R + GPO, all tightly integrated and with a schema that the Microsoft ecosystem depends on. You can query AD with standard ldapsearch. You cannot replace it with OpenLDAP without breaking every Windows client.

“Linux machines in AD get GPO.” Linux machines appear in AD and can be organized into OUs. Standard GPOs don’t apply to them. Samba’s samba-gpupdate can process a subset of AD policy for Linux — mostly Registry and Security settings mapped to Linux equivalents.

“realm leave removes the machine cleanly.” realm leave removes local configuration but does not delete the machine account from AD. The stale computer object stays in CN=Computers until an AD admin deletes it. Always run realm leave && adcli delete-computer -U Administrator for a clean removal.


Framework Alignment

Domain Relevance
CISSP Domain 5: Identity and Access Management AD is the dominant enterprise identity store — understanding its LDAP structure, Kerberos realm, and GPO model is essential for IAM in mixed environments
CISSP Domain 4: Communications and Network Security AD replication traffic (RPC, LDAP, Kerberos) is a significant portion of enterprise WAN traffic — Sites and site links are a network security and performance design decision
CISSP Domain 3: Security Architecture and Engineering AD forest/domain/OU hierarchy is an architectural decision with long-term security consequences — getting OU structure wrong constrains GPO delegation for years

Key Takeaways

  • AD is LDAP + Kerberos + DNS + GPO + DFS-R — not a product that “uses” these; they’re the implementation
  • Replication is multi-master via USN + GUID; the KCC builds the topology automatically from Sites configuration
  • objectGUID is the stable identifier — not the DN, which changes on rename/move
  • realm join is the correct way to join Linux to AD — it configures SSSD, Kerberos, PAM, and NSS correctly in one command
  • userAccountControl is the bitmask that controls account state — (userAccountControl:1.2.840.113556.1.4.803:=2) finds disabled accounts

What’s Next

EP09 covered AD — LDAP and Kerberos inside the corporate network. EP10 covers what happens when identity needs to work across the internet, where Kerberos doesn’t reach: SAML, OAuth2, and OIDC — the protocols that let identity leave the building.

Next: SAML vs OIDC vs OAuth2: Which Protocol Handles Which Identity Problem

Get EP10 in your inbox when it publishes → linuxcent.com/subscribe
LDAP High Availability: Load Balancing and Production Architecture

Reading Time: 6 minutes

The Identity Stack, Episode 7
EP06: OpenLDAPEP07EP08: FreeIPA → …


TL;DR

  • LDAP HA means multiple directory servers behind a load balancer — clients connect to a VIP, not to individual servers
  • Read/write split: all writes go to the provider, reads are distributed across consumers — the load balancer enforces this by routing on port or backend check
  • SSSD handles multi-server failover natively (ldap_uri accepts a comma-separated list) — for apps without built-in failover, HAProxy with health checks does the work
  • Connection pooling is critical at scale — nss_ldap and pam_ldap opened a new connection per login; SSSD maintains a pool; apps that use libldap directly must implement their own
  • cn=monitor is the built-in monitoring endpoint — exposes connection counts, operation rates, and backend stats readable via ldapsearch
  • 389-DS (Red Hat Directory Server) is the production choice for >1M entries — purpose-built for large directories with a dedicated replication engine

The Big Picture: Production LDAP Topology

         Clients (SSSD, apps, VPN concentrators)
                      │
              ┌───────▼───────┐
              │   HAProxy VIP  │   ← single endpoint, port 389/636
              │  10.0.0.10     │
              └───────┬───────┘
                      │
          ┌───────────┼───────────┐
          ▼           ▼           ▼
   ldap1.corp.com  ldap2.corp.com  ldap3.corp.com
   (Provider)      (Consumer)      (Consumer)
   Reads + Writes  Reads only      Reads only
          │           ▲               ▲
          └───────────┴───────────────┘
               SyncRepl replication

EP06 built a two-node replicated directory. This episode covers what happens when the directory becomes infrastructure — when it needs to survive a node failure, handle thousands of connections, and be monitored like any other critical service.


HAProxy for LDAP

HAProxy is the standard choice for LDAP load balancing. Unlike HTTP, LDAP is a stateful protocol — once a client binds, subsequent operations on that connection share the authenticated session. The load balancer must use connection persistence, not per-request routing.

# /etc/haproxy/haproxy.cfg

global
    log /dev/log local0
    maxconn 50000

defaults
    mode tcp                  # LDAP is TCP, not HTTP
    timeout connect 5s
    timeout client  30s
    timeout server  30s
    option tcplog

# ── LDAP read/write split ─────────────────────────────────────────────

# Writes → provider only
frontend ldap-write
    bind *:389
    default_backend ldap-provider

backend ldap-provider
    balance first                   # always use first available (provider)
    option tcp-check
    tcp-check connect
    server ldap1 ldap1.corp.com:389 check inter 5s rise 2 fall 3
    server ldap2 ldap2.corp.com:389 check inter 5s rise 2 fall 3 backup

# Reads → all nodes round-robin
frontend ldap-read
    bind *:3389                     # internal read port
    default_backend ldap-consumers

backend ldap-consumers
    balance roundrobin
    option tcp-check
    tcp-check connect
    server ldap1 ldap1.corp.com:389 check inter 5s
    server ldap2 ldap2.corp.com:389 check inter 5s
    server ldap3 ldap3.corp.com:389 check inter 5s

# LDAPS (TLS)
frontend ldaps
    bind *:636
    default_backend ldap-consumers-tls

backend ldap-consumers-tls
    balance roundrobin
    server ldap1 ldap1.corp.com:636 check inter 5s ssl verify required ca-file /etc/ssl/certs/ca.pem
    server ldap2 ldap2.corp.com:636 check inter 5s ssl verify required ca-file /etc/ssl/certs/ca.pem

The health check (tcp-check connect) just verifies TCP connectivity. For a more precise check — verifying that slapd is actually responding to LDAP requests — use a custom script that runs ldapsearch and checks the result code.


SSSD Multi-Server Failover

SSSD has native failover — no load balancer required for SSSD-based clients:

# /etc/sssd/sssd.conf
[domain/corp.com]
ldap_uri = ldap://ldap1.corp.com, ldap://ldap2.corp.com, ldap://ldap3.corp.com
# SSSD tries them in order; switches to next on failure
# Switches back to primary after ldap_recovery_interval (default: 30s)

# For AD, discovery via DNS SRV records is even better:
ad_server = _srv_
# SSSD queries _ldap._tcp.corp.com SRV records and gets all DCs automatically

SSSD monitors the connection health. If the current server becomes unreachable, it switches to the next in the list within seconds. Existing cached data keeps serving during the switchover. Clients using SSSD don’t need a load balancer for basic HA.


Connection Pooling

Every LDAP bind creates an authenticated session on the server. A server with connection limits (olcConnMaxPending, olcConnMaxPendingAuth in OLC) will reject new connections when those limits are hit.

The problem: applications that use libldap directly tend to open a new connection per operation. At 500 requests/second, that’s 500 new TCP connections, 500 binds, 500 TLS handshakes per second — a directory that can handle 5000 concurrent connections starts refusing new ones.

The solutions:

SSSD — handles this automatically. SSSD maintains one or a small number of persistent connections per domain and multiplexes all PAM/NSS queries through them.

Application-level pooling — frameworks like python-ldap with connection pooling, ldap3 with connection strategies, or dedicated middleware like 389-DS‘s Directory Proxy Server.

ldap_maxconnections in OpenLDAP — sets a hard limit. When hit, new connections block until existing ones close. Set this to something reasonable (olcConnMaxPending: 100 in OLC) so you get a controlled failure mode instead of unbounded queuing.


Monitoring with cn=monitor

OpenLDAP exposes live operational statistics via the cn=monitor database — a virtual LDAP subtree that reflects the server’s current state. Enable it:

# enable-monitor.ldif
dn: cn=module,cn=config
objectClass: olcModuleList
cn: module
olcModulePath: /usr/lib/ldap
olcModuleLoad: back_monitor

dn: olcDatabase=monitor,cn=config
objectClass: olcDatabaseConfig
olcDatabase: monitor
olcAccess: to *
  by dn="cn=admin,dc=corp,dc=com" read
  by * none

Query it:

# Overall statistics
ldapsearch -x -H ldap://localhost \
  -D "cn=admin,dc=corp,dc=com" -w password \
  -b "cn=monitor" -s sub "(objectClass=*)" \
  monitorOpInitiated monitorOpCompleted

# Connection counts
ldapsearch -x -H ldap://localhost \
  -D "cn=admin,dc=corp,dc=com" -w password \
  -b "cn=Connections,cn=monitor" -s one \
  monitorConnectionNumber

# Operations by type
ldapsearch -x -H ldap://localhost \
  -D "cn=admin,dc=corp,dc=com" -w password \
  -b "cn=Operations,cn=monitor" -s one \
  monitorOpInitiated monitorOpCompleted

Useful metrics to export to Prometheus (via prometheus-openldap-exporter or similar):
monitorOpCompleted per operation type (bind, search, modify)
monitorConnectionNumber — current connection count
– Backend-specific: olmMDBEntries, olmMDBPagesMax, olmMDBPagesUsed


389-DS: LDAP at Scale

OpenLDAP is excellent for directories up to a few million entries. When you need:
– 10M+ entries
– High write throughput (more than a few hundred writes/second)
– Fine-grained replication filtering
– A dedicated web-based admin UI

…389-DS (Red Hat Directory Server, community edition) is the production answer. It’s what FreeIPA uses under the hood.

Key architectural differences from OpenLDAP:

Multi-supplier replication — 389-DS’s replication engine uses a dedicated changelog (stored in LMDB) and Change Sequence Numbers (CSNs) for conflict resolution. Multi-supplier (multi-master) replication is first-class, not a bolted-on feature.

Changelog — every change is written to a persistent changelog before being applied. This enables precise replication: a consumer can reconnect after a network partition and get exactly the changes it missed, rather than doing a full resync.

Plugin architecture — 389-DS functionality (replication, managed entries, DNA for automatic UID allocation, memberOf, password policy) is all implemented as plugins that can be enabled/disabled per directory instance.

# Install 389-DS
dnf install -y 389-ds-base

# Create a new instance
dscreate interactive
# — or use a template:
dscreate from-file /path/to/instance.inf

# Manage with dsctl
dsctl slapd-corp status
dsctl slapd-corp start
dsctl slapd-corp stop

# Admin with dsconf
dsconf slapd-corp backend suffix list
dsconf slapd-corp replication status -suffix "dc=corp,dc=com"

The dsconf replication status command gives a live view of replication lag across all suppliers and consumers — something OpenLDAP requires you to compute manually from contextCSN comparisons.


Global Catalog: Cross-Domain Search in AD

When your directory spans multiple AD domains in a forest, the Global Catalog solves a specific problem: a user in emea.corp.com needs to be found by an app that only knows corp.com.

Forest: corp.com
  ├── corp.com       → DC port 389    full directory: 500K entries
  ├── emea.corp.com  → DC port 389    full directory: 200K entries
  └── Global Catalog → GC port 3268  partial replica: 700K entries
                                       (not all attributes — just the most queried ones)

The GC replicates a subset of attributes from every domain in the forest. By default: cn, mail, sAMAccountName, userPrincipalName, memberOf, and about 150 others. Attributes marked with isMemberOfPartialAttributeSet in the schema are replicated to the GC.

If an application is configured to use port 3268 instead of 389, it’s using the GC — and it won’t see attributes not included in the partial attribute set. This surprises teams that add a custom attribute to AD and then wonder why their application can’t see it on 3268 but can on 389.


⚠ Production Gotchas

HAProxy TCP health checks don’t verify LDAP is responsive. A server can accept TCP connections but have slapd in a degraded state (database corruption, out-of-memory). Build a proper LDAP health check: a script that binds and searches a known entry and checks the result.

replication lag under write load. SyncRepl consumers can fall behind under sustained write load. Monitor the contextCSN difference between provider and consumers. If consumers are more than a few seconds behind, investigate the provider’s write throughput and the consumer’s processing speed.

Directory size and the MDB mapsize. LMDB requires a pre-configured maximum database size (olcDbMaxSize). If the database grows beyond this, slapd starts failing writes. Set it to 2–4x your expected data size and monitor olmMDBPagesUsed / olmMDBPagesMax.


Key Takeaways

  • HAProxy in TCP mode provides LDAP load balancing — use balance first for write routing (provider only), balance roundrobin for reads
  • SSSD has native failover via ldap_uri — for SSSD clients, a load balancer adds HA but isn’t strictly required
  • cn=monitor is the built-in OpenLDAP monitoring endpoint — export its counters to Prometheus for operational visibility
  • 389-DS is the right choice for >1M entries, high write throughput, or multi-supplier replication as a first-class feature
  • Global Catalog (port 3268/3269) is a partial replica of all AD domains — useful for forest-wide searches, but missing non-replicated attributes

What’s Next

EP07 covers the infrastructure layer. EP08 zooms out to FreeIPA — what you get when LDAP, Kerberos, DNS, PKI, and HBAC are integrated into a single Linux-native identity stack, and why most Linux shops running their own directory should be running FreeIPA instead of bare OpenLDAP.

Next: FreeIPA: LDAP + Kerberos + PKI in a Single Linux Identity Stack

Get EP08 in your inbox when it publishes → linuxcent.com/subscribe
OpenLDAP Setup and Replication: Running Your Own Directory

Reading Time: 5 minutes

The Identity Stack, Episode 6
EP01 → … → EP05: KerberosEP06EP07: LDAP HA → …


TL;DR

  • OpenLDAP’s server process is slapd — the backend that stores data is MDB (LMDB), a memory-mapped B-tree that replaced the old Berkeley DB backend
  • Configuration lives in the directory itself: cn=config (OLC — Online Configuration) lets you modify slapd at runtime without restarting
  • SyncRepl is the replication protocol: a consumer subscribes to a provider and stays in sync via either polling (refreshOnly) or a persistent connection (refreshAndPersist)
  • Multi-Provider (formerly Multi-Master) lets multiple nodes accept writes — conflict resolution uses CSN (Change Sequence Number), last-writer-wins
  • The essential tools: slapd, ldapadd, ldapmodify, ldapsearch, slapcat, slaptest
  • Always build indexes on the attributes you search most — uid, cn, memberOf — or every search is a full scan

The Big Picture: slapd Architecture

ldapsearch / ldapadd / SSSD / any LDAP client
              │ TCP 389 / 636
              ▼
         ┌─────────────────────────────────┐
         │  slapd (OpenLDAP server)         │
         │                                 │
         │  Frontend (protocol layer)       │
         │    • parse BER requests          │
         │    • ACL enforcement             │
         │    • schema validation           │
         │                                 │
         │  Backend (storage layer)         │
         │    • MDB (LMDB) — default       │
         │    • memory-mapped file I/O      │
         │    • ACID transactions           │
         └────────────┬────────────────────┘
                      │
              /var/lib/ldap/
              data.mdb   (the directory data)
              lock.mdb   (LMDB lock file)

EP05 showed Kerberos in isolation. OpenLDAP is where you run the identity store that Kerberos references — and where SSSD looks up user and group attributes. This episode builds a working two-node replicated directory from scratch.


Installation

# Ubuntu / Debian
apt-get install -y slapd ldap-utils

# RHEL / Rocky / AlmaLinux
dnf install -y openldap-servers openldap-clients

# After install — Ubuntu runs a configuration wizard
# Skip it: dpkg-reconfigure slapd
# Or answer it and then switch to OLC management

On RHEL-family systems, slapd is not configured after install — you work entirely through OLC from the start.


OLC: The Directory Configures Itself

The old way was slapd.conf — a static file that required a full restart on every change. OLC (Online Configuration) replaced it: slapd‘s own configuration is stored as LDAP entries under cn=config. You modify configuration the same way you modify data — with ldapmodify. Changes take effect immediately.

cn=config                        ← root config entry
├── cn=schema,cn=config          ← schema definitions
│     ├── cn={0}core             ← core schema
│     ├── cn={1}cosine           ← RFC 1274 attributes
│     └── cn={2}inetorgperson    ← inetOrgPerson object class
├── olcDatabase={-1}frontend     ← default settings for all databases
├── olcDatabase={0}config        ← the config database itself
└── olcDatabase={1}mdb           ← your actual directory data
      ├── olcAccess              ← ACLs
      ├── olcSuffix              ← base DN (e.g., dc=corp,dc=com)
      └── olcDbIndex             ← search indexes

Everything under cn=config has attributes prefixed with olc (OpenLDAP Configuration). You query and modify it just like any other LDAP subtree — with one restriction: only the cn=config admin (usually gidNumber=0+uidNumber=0,cn=peercred,cn=external,cn=auth — the local root via SASL EXTERNAL) can write to it.


Bootstrapping a Directory

The quickest way to get a working directory is a set of LDIF files applied in order.

1. Load schemas

# Apply the schemas OpenLDAP ships with
ldapadd -Y EXTERNAL -H ldapi:/// \
  -f /etc/ldap/schema/cosine.ldif
ldapadd -Y EXTERNAL -H ldapi:/// \
  -f /etc/ldap/schema/inetorgperson.ldif
ldapadd -Y EXTERNAL -H ldapi:/// \
  -f /etc/ldap/schema/nis.ldif       # adds posixAccount, posixGroup

2. Configure the MDB database

# mdb-config.ldif
dn: olcDatabase={1}mdb,cn=config
changetype: modify
replace: olcSuffix
olcSuffix: dc=corp,dc=com
-
replace: olcRootDN
olcRootDN: cn=admin,dc=corp,dc=com
-
replace: olcRootPW
olcRootPW: {SSHA}hashed_password_here

Generate the hash: slappasswd -s yourpassword

ldapmodify -Y EXTERNAL -H ldapi:/// -f mdb-config.ldif

3. Add indexes

# indexes.ldif
dn: olcDatabase={1}mdb,cn=config
changetype: modify
add: olcDbIndex
olcDbIndex: uid eq,pres
olcDbIndex: cn eq,sub
olcDbIndex: sn eq,sub
olcDbIndex: mail eq
olcDbIndex: memberOf eq
olcDbIndex: entryCSN eq
olcDbIndex: entryUUID eq

The last two (entryCSN, entryUUID) are required for SyncRepl replication to work efficiently.

4. Load initial data

# base.ldif
dn: dc=corp,dc=com
objectClass: top
objectClass: dcObject
objectClass: organization
o: Corp
dc: corp

dn: ou=people,dc=corp,dc=com
objectClass: organizationalUnit
ou: people

dn: ou=groups,dc=corp,dc=com
objectClass: organizationalUnit
ou: groups

dn: uid=vamshi,ou=people,dc=corp,dc=com
objectClass: inetOrgPerson
objectClass: posixAccount
objectClass: shadowAccount
cn: Vamshi Krishna
sn: Krishna
uid: vamshi
uidNumber: 1001
gidNumber: 1001
homeDirectory: /home/vamshi
loginShell: /bin/bash
mail: [email protected]
userPassword: {SSHA}hashed_password_here
ldapadd -x -H ldap://localhost \
  -D "cn=admin,dc=corp,dc=com" \
  -w adminpassword \
  -f base.ldif

ACLs: Who Can Read What

OpenLDAP ACLs are evaluated top-to-bottom; first match wins.

# acls.ldif — set via OLC
dn: olcDatabase={1}mdb,cn=config
changetype: modify
replace: olcAccess
# Users can change their own passwords
olcAccess: to attrs=userPassword
  by self write
  by anonymous auth
  by * none
# Users can read their own entry
olcAccess: to dn.base="ou=people,dc=corp,dc=com"
  by self read
  by users read
  by * none
# Service accounts can read everything (for SSSD)
olcAccess: to *
  by dn="cn=svc-ldap,ou=services,dc=corp,dc=com" read
  by self read
  by * none

A service account (cn=svc-ldap) that SSSD uses to search the directory needs read access to ou=people and ou=groups. Never give SSSD admin (write) access.


SyncRepl Replication

SyncRepl is a pull-based replication protocol built on the LDAP Sync operation (RFC 4533). A consumer connects to a provider and requests changes. The provider sends them. The consumer stays in sync.

On the Provider: Enable the syncprov overlay

# syncprov.ldif
dn: olcOverlay=syncprov,olcDatabase={1}mdb,cn=config
objectClass: olcOverlayConfig
objectClass: olcSyncProvConfig
olcOverlay: syncprov
olcSpCheckpoint: 100 10     # checkpoint every 100 ops or 10 minutes
olcSpSessionLog: 100        # keep last 100 changes for delta-sync
ldapadd -Y EXTERNAL -H ldapi:/// -f syncprov.ldif

On the Consumer: Configure syncrepl

# consumer-config.ldif
dn: olcDatabase={1}mdb,cn=config
changetype: modify
add: olcSyncrepl
olcSyncrepl: rid=001
  provider=ldap://ldap1.corp.com:389
  bindmethod=simple
  binddn="cn=repl-svc,dc=corp,dc=com"
  credentials=replication-password
  searchbase="dc=corp,dc=com"
  scope=sub
  schemachecking=on
  type=refreshAndPersist    # persistent connection (vs refreshOnly = polling)
  retry="5 5 60 +"          # retry: 5 times every 5s, then every 60s forever
  interval=00:00:05:00      # (for refreshOnly) sync every 5 minutes
-
add: olcUpdateRef
olcUpdateRef: ldap://ldap1.corp.com   # redirect writes to provider

refreshAndPersist keeps a persistent connection open. Changes replicate within milliseconds. refreshOnly polls on an interval — simpler, but adds latency.

Verify Replication

# On provider: check the contextCSN (the sync state token)
ldapsearch -x -H ldap://ldap1.corp.com \
  -D "cn=admin,dc=corp,dc=com" -w password \
  -b "dc=corp,dc=com" -s base contextCSN
# contextCSN: 20260427010000.000000Z#000000#000#000000

# On consumer: should match after sync
ldapsearch -x -H ldap://ldap2.corp.com \
  -D "cn=admin,dc=corp,dc=com" -w password \
  -b "dc=corp,dc=com" -s base contextCSN
# Same CSN = in sync

Multi-Provider: Accepting Writes on Both Nodes

Standard SyncRepl has one provider and one or more consumers — only the provider accepts writes. Multi-Provider (formerly Multi-Master) lets every node accept writes.

# On each node — add mirrormode to the database config
dn: olcDatabase={1}mdb,cn=config
changetype: modify
add: olcMirrorMode
olcMirrorMode: TRUE

With mirrormode enabled and each node configured as both provider and consumer of the other, writes on either node replicate to the other. Conflict resolution is CSN-based (Change Sequence Number) — a monotonically increasing timestamp. Last write wins at the attribute level.

Multi-Provider does not prevent split-brain conflicts — if two clients write the same attribute on two different nodes during a network partition, the higher CSN wins when the partition heals. For most directory use cases (user passwords, group memberships), this is acceptable. For others, it requires careful thought.


⚠ Production Gotchas

MDB data file grows monotonically. LMDB never shrinks the data file automatically. Deleted entries leave free space inside the file that gets reused, but the file on disk doesn’t shrink. Use slapcat to export and slapadd to reimport if you need to reclaim disk space.

slapcat is the only safe backup. slapcat reads the MDB database directly and exports LDIF — it does not go through slapd. Run it while slapd is running (LMDB is MVCC-safe for readers), but never copy the raw MDB files while slapd is running.

Schema changes on a replicated directory require coordination. Load the new schema on the provider first. SyncRepl will propagate it to consumers — but if a consumer gets a new entry using the new schema before the schema itself is replicated, the import will fail. Load schemas manually on all nodes before adding entries that use them.


Key Takeaways

  • OpenLDAP uses LMDB (MDB backend) — a memory-mapped, ACID-compliant storage engine with no external dependency
  • OLC (cn=config) is the right way to configure slapd — changes apply without restarts
  • SyncRepl pulls changes from a provider to a consumer — refreshAndPersist for near-real-time, refreshOnly for poll-based
  • Always index uid, cn, entryCSN, and entryUUID — unindexed searches are full scans
  • Multi-Provider allows writes on all nodes with CSN-based last-write-wins conflict resolution

What’s Next

A single OpenLDAP server works. Two nodes with SyncRepl work better. EP07 goes further: how you put multiple LDAP servers behind a load balancer, how connection pooling works, what to monitor, and how 389-DS handles directories with tens of millions of entries.

Next: LDAP High Availability: Load Balancing and Production Architecture

Get EP07 in your inbox when it publishes → linuxcent.com/subscribe
How Kerberos Works: Tickets, KDC, and Why Enterprises Use It With LDAP

Reading Time: 7 minutes

The Identity Stack, Episode 5
EP01EP02EP03EP04: SSSDEP05EP06: OpenLDAP → …


TL;DR

  • Kerberos is a network authentication protocol — it proves identity without sending passwords over the network, using time-limited cryptographic tickets
  • Three actors: the client, the KDC (Key Distribution Center), and the service — the KDC issues tickets; clients use tickets to authenticate to services
  • The ticket flow: AS-REQ (get a TGT) → TGS-REQ (exchange TGT for a service ticket) → AP-REQ (present service ticket to the target service)
  • A TGT (Ticket-Granting Ticket) is a session credential — it lets you request service tickets without re-entering your password for the lifetime of the ticket (default 10 hours)
  • LDAP + Kerberos together: LDAP stores identity (who you are), Kerberos authenticates it (proves you are who you say you are) — Active Directory is exactly this combination
  • kinit, klist, kdestroy are the hands-on tools — run them and read the ticket output

The Big Picture: Three Actors, Three Steps

         1. AS-REQ / AS-REP
Client ◄────────────────────► AS (Authentication Server)
  │                                     │
  │    (part of KDC)                    │
  │                                     ▼
  │         2. TGS-REQ / TGS-REP   TGS (Ticket-Granting Server)
  ├───────────────────────────────────►│
  │         (part of KDC)              │
  │                                    │
  │    3. AP-REQ / AP-REP              │
  └─────────────────────────────► Service (SSH, LDAP, NFS, HTTP...)

KDC = AS + TGS (usually the same process, same machine)

EP04 mentioned Kerberos tickets and clock skew requirements without explaining the protocol. This episode explains why Kerberos was invented, what a ticket actually is, and how the three-step flow works — so that when SSSD says “KDC unreachable” or kinit fails with “pre-authentication required,” you know exactly what’s happening.


The Problem Kerberos Was Built to Solve

MIT’s Project Athena started in 1983 — a campus-wide computing initiative giving students access to thousands of workstations. The problem: how do you authenticate a student at workstation 847 to a file server across campus without sending their password over the network?

In 1988, Steve Miller and Clifford Neuman published Kerberos version 4. The core insight: a trusted third party (the KDC) can issue cryptographic proof that a user has authenticated, and that proof can be presented to any service on the network without the service ever seeing the user’s password.

The password never leaves the client machine after the initial authentication. Every subsequent authentication — to a different service, to the same service again — uses a ticket. The KDC knows both the client and the service. The client and service only need to trust the KDC.


Keys, Tickets, and Sessions

Before the protocol, the primitives:

Long-term keys — derived from passwords. When you set a password in Kerberos, it’s hashed into a key stored in the KDC database (in the krbtgt account on AD, in /var/lib/krb5kdc/principal on MIT Kerberos). The client also derives this key from the password at authentication time. Neither ever sends the raw password.

Session keys — temporary symmetric keys created by the KDC for a specific session. They’re valid for the ticket’s lifetime. After the ticket expires, the session key is useless.

Tickets — encrypted blobs issued by the KDC. A ticket contains the session key, the client identity, the expiry time, and optional flags. It’s encrypted with the target service’s long-term key — only the service can decrypt it. The client carries the ticket but can’t read the contents.


The Three-Step Flow

Step 1: AS-REQ / AS-REP — Getting a TGT

Client                        KDC (AS component)
  │                                │
  │── AS-REQ ──────────────────────►
  │   {username, timestamp}         │
  │   (timestamp encrypted with     │
  │    client's long-term key)       │
  │                                 │
  │   KDC verifies: decrypts        │
  │   timestamp with stored key.    │
  │   If valid → issues TGT         │
  │                                 │
  ◄── AS-REP ──────────────────────│
      {session_key_enc_with_client, │
       TGT_enc_with_krbtgt_key}     │

The client decrypts the session key using its long-term key (derived from the password). The TGT is encrypted with the KDC’s own key (krbtgt) — the client can’t read it, but carries it.

This is the step that requires the password. After this, the TGT is what the client uses for everything else.

Step 2: TGS-REQ / TGS-REP — Getting a Service Ticket

Client                        KDC (TGS component)
  │                                │
  │── TGS-REQ ─────────────────────►
  │   {TGT, authenticator,         │
  │    target_service_name}        │
  │   (authenticator encrypted      │
  │    with TGT session key)        │
  │                                 │
  │   KDC: decrypts TGT,           │
  │   verifies authenticator,       │
  │   issues service ticket         │
  │                                 │
  ◄── TGS-REP ────────────────────│
      {service_session_key_enc,    │
       service_ticket_enc_with_    │
       service_long_term_key}      │

No password involved. The client proves its identity by presenting the TGT (which only the KDC can issue) and an authenticator (a timestamp encrypted with the TGT’s session key, proving the client holds the session key without revealing it).

Step 3: AP-REQ / AP-REP — Authenticating to the Service

Client                        Service (sshd, LDAP, NFS...)
  │                                │
  │── AP-REQ ──────────────────────►
  │   {service_ticket,             │
  │    authenticator_enc_with_      │
  │    service_session_key}        │
  │                                 │
  │   Service: decrypts ticket      │
  │   with its long-term key,       │
  │   verifies authenticator        │
  │                                 │
  ◄── AP-REP (optional) ───────────│
      {mutual authentication}       │

The service decrypts the ticket using its own key. It extracts the client identity and session key. It verifies the authenticator. No communication with the KDC required — the service trusts what the KDC signed.


Why Clock Skew Matters

Every Kerberos authenticator contains a timestamp. The service rejects authenticators older than 5 minutes (by default) — this prevents replay attacks where an attacker captures an authenticator and replays it later.

This is why clock skew over 5 minutes breaks Kerberos authentication entirely. If your machine’s clock drifts 6 minutes from the KDC, every authenticator you generate is rejected as too old or too far in the future. No tickets. No AD logins. No SSSD authentication.

# Check time sync status
timedatectl status
chronyc tracking        # if using chrony
ntpq -p                 # if using ntpd

# If clock is off: force a sync
chronyc makestep        # immediate step correction (chrony)

Hands-On: kinit, klist, kdestroy

# Get a TGT (will prompt for password)
kinit [email protected]

# Show current tickets
klist
# Credentials cache: FILE:/tmp/krb5cc_1001
# Principal: [email protected]
#
# Valid starting     Expires            Service principal
# 04/27/26 01:00:00  04/27/26 11:00:00  krbtgt/[email protected]
#   renew until 05/04/26 01:00:00

# Show encryption types used (the -e flag)
klist -e
# 04/27/26 01:00:00  04/27/26 11:00:00  krbtgt/[email protected]
#         Etype: aes256-cts-hmac-sha1-96, aes256-cts-hmac-sha1-96

# Get a service ticket for a specific service
kvno host/[email protected]
# host/[email protected]: kvno = 3

# Show all tickets including service tickets
klist -f
# Flags: F=forwardable, f=forwarded, P=proxiable, p=proxy, D=postdated,
#        d=postdated, R=renewable, I=initial, i=invalid, H=hardware auth

# Destroy all tickets
kdestroy

The Valid starting and Expires fields are the ticket lifetime. After expiry, you need to re-authenticate (or renew the ticket if it’s within the renew until window). The renew until date is when even renewal stops working.


/etc/krb5.conf

[libdefaults]
    default_realm = CORP.COM
    dns_lookup_realm = false
    dns_lookup_kdc = true         # find KDCs via DNS SRV records
    ticket_lifetime = 10h
    renew_lifetime = 7d
    forwardable = true            # tickets can be forwarded to remote hosts (needed for SSH forwarding)
    rdns = false

[realms]
    CORP.COM = {
        kdc = dc01.corp.com
        kdc = dc02.corp.com       # failover KDC
        admin_server = dc01.corp.com
    }

[domain_realm]
    .corp.com = CORP.COM
    corp.com = CORP.COM

With dns_lookup_kdc = true, Kerberos finds KDCs by querying DNS SRV records (_kerberos._tcp.corp.com). AD sets these up automatically. On MIT Kerberos, you add them manually. DNS-based discovery is the recommended approach for AD environments — it picks up new DCs automatically.


Kerberos + LDAP: Why Enterprises Run Both

LDAP and Kerberos solve different problems and are almost always deployed together:

LDAP answers:  "Who is vamshi? What groups is he in? What's his home directory?"
Kerberos answers: "Is this really vamshi? Prove it without sending a password."

Active Directory is exactly this combination — the directory is LDAP-based, the authentication is Kerberos. When a Linux machine joins an AD domain via realm join or adcli, it gets:
– LDAP access to the AD directory (for NSS: user and group lookups)
– A Kerberos principal registered in AD (for PAM: ticket-based authentication)
– A machine account (the machine’s identity in the directory)

When you SSH into an AD-joined Linux machine:
1. SSSD issues a Kerberos AS-REQ for the user’s TGT
2. SSSD uses the TGT to get a service ticket for the Linux machine’s PAM service
3. Authentication is verified via the service ticket — no LDAP Bind with a password
4. SSSD does an LDAP Search to get POSIX attributes (UID, GID, home dir)

Password-based LDAP Bind is the fallback when Kerberos isn’t available. Kerberos is the default on AD-joined systems — and it’s more secure because the password never leaves the client.


⚠ Common Misconceptions

“Kerberos sends your password to the KDC.” It doesn’t. The client derives a key from the password locally and uses that key to encrypt a timestamp (the pre-authentication data). The KDC verifies the timestamp using the stored key. The raw password never travels.

“Kerberos is an authorization protocol.” Kerberos authenticates — it proves who you are. Authorization (what you can do) is a separate decision, usually handled by ACLs on the service or directory group membership.

“Once you have a TGT, you’re authenticated to everything.” A TGT only proves your identity to the KDC. Each service requires a separate service ticket. The TGT is what lets you get those service tickets without re-entering your password.

“Kerberos requires AD.” MIT Kerberos 5 is a standalone implementation. FreeIPA (EP08) runs MIT Kerberos. Heimdal is another implementation. AD uses a Microsoft-extended version of Kerberos 5, but the core protocol is the same RFC.


Framework Alignment

Domain Relevance
CISSP Domain 5: Identity and Access Management Kerberos is the de facto enterprise authentication protocol — SSO, delegation, and service account authentication all depend on it
CISSP Domain 4: Communications and Network Security Kerberos prevents credential sniffing and replay attacks — two of the core network authentication threat categories
CISSP Domain 3: Security Architecture and Engineering The KDC is a critical single point of trust — its availability, key management, and account (krbtgt) rotation are architectural security decisions

Key Takeaways

  • Kerberos is a ticket-based protocol — the password is used once to get a TGT; from then on, tickets prove identity without the password
  • The three-step flow: get a TGT from the AS, exchange it for a service ticket at the TGS, present the service ticket to the target service
  • Clock skew over 5 minutes breaks Kerberos — time synchronization is a hard dependency
  • LDAP stores identity; Kerberos authenticates it — Active Directory is exactly this combination, and so is FreeIPA
  • klist -e shows the encryption types in use — aes256-cts-hmac-sha1-96 is what you want to see; arcfour-hmac (RC4) is legacy and should be disabled

What’s Next

EP05 covered Kerberos as a protocol. EP06 goes hands-on: building a real LDAP directory with OpenLDAP, configuring replication, and understanding how the server-side components — slapd, the MDB backend, SyncRepl — fit together.

Next: OpenLDAP Setup and Replication: Running Your Own Directory

Get EP06 in your inbox when it publishes → linuxcent.com/subscribe
Hardening Blueprint as Code — Declare Your OS Baseline in YAML

Reading Time: 6 minutes

OS Hardening as Code, Episode 2
Cloud AMI Security Risks · Linux Hardening as Code**


TL;DR

  • A hardening runbook is a list of steps someone runs. A HardeningBlueprint YAML is a build artifact — if it wasn’t applied, the image doesn’t exist
  • Linux hardening as code means declaring your entire OS security baseline in a single YAML file and building it reproducibly across any provider
  • stratum build --blueprint ubuntu22-cis-l1.yaml --provider aws either produces a hardened image or fails — there is no partial state
  • The blueprint includes: target OS/provider, compliance benchmark, Ansible roles, and per-control overrides with documented reasons
  • One blueprint file = one source of truth for your hardening posture, version-controlled and reviewable like any other infrastructure code
  • Post-build OpenSCAP scan runs automatically — the image only snapshots if it passes

The Problem: A Runbook That Gets Skipped Once Is a Runbook That Gets Skipped

Hardening runbook
       │
       ▼
  Human executes
  steps manually
       │
       ├─── 47 deployments: followed correctly
       │
       └─── 1 deployment at 2am: step 12 skipped
                    │
                    ▼
           Instance in production
           without audit logging,
           SSH password auth enabled,
           unnecessary services running

Linux hardening as code eliminates the human decision point. If the blueprint wasn’t applied, the image doesn’t exist.

EP01 showed that default cloud AMIs arrive pre-broken — unnecessary services, no audit logging, weak kernel parameters, SSH configured for convenience not security. The obvious response is a hardening script. But a script run by a human is still a process step. It can be skipped. It can be done halfway. It can drift across different engineers who each interpret “run the hardening script” slightly differently.


A production deployment last year. The platform team had a solid CIS L1 hardening runbook — 68 steps, well-documented, followed consistently. Then a critical incident at 2am required three new instances to be deployed on short notice. The engineer on call ran the provisioning script and, under pressure, skipped the hardening step with the intention of running it the next morning.

They didn’t. The three instances stayed in production unhardened for six weeks before an automated scan caught them. Audit logging wasn’t configured. SSH was accepting password authentication. Two unnecessary services were running that weren’t in the approved software list.

Nothing was breached. But the finding went into the next compliance report as a gap, the team spent a week remediating, and the post-mortem conclusion was “we need better runbook discipline.”

That’s the wrong conclusion. The runbook isn’t the problem. The problem is that hardening was a process step instead of a build constraint.


What Linux Hardening as Code Actually Means

Linux hardening as code is the same principle as infrastructure as code applied to OS security posture: the desired state is declared in a file, the file is the source of truth, and the execution is deterministic and repeatable.

HardeningBlueprint YAML
         │
         ▼
  stratum build
         │
  ┌──────┴──────────────────┐
  │  Provider Layer          │
  │  (cloud-init, disk       │
  │   names, metadata        │
  │   endpoint per provider) │
  └──────┬──────────────────┘
         │
  ┌──────┴──────────────────┐
  │  Ansible-Lockdown        │
  │  (CIS L1/L2, STIG —      │
  │   the hardening steps)   │
  └──────┬──────────────────┘
         │
  ┌──────┴──────────────────┐
  │  OpenSCAP Scanner        │
  │  (post-build verify)     │
  └──────┬──────────────────┘
         │
         ▼
  Golden Image (AMI/GCP image/Azure image)
  + Compliance grade in image metadata

The YAML file is what you write. Stratum handles the rest.


The HardeningBlueprint YAML

The blueprint is the complete, auditable declaration of your OS security posture:

# ubuntu22-cis-l1.yaml
name: ubuntu22-cis-l1
description: Ubuntu 22.04 CIS Level 1 baseline for production workloads
version: "1.0"

target:
  os: ubuntu
  version: "22.04"
  provider: aws
  region: ap-south-1
  instance_type: t3.medium

compliance:
  benchmark: cis-l1
  controls: all

hardening:
  - ansible-lockdown/UBUNTU22-CIS
  - role: custom-audit-logging
    vars:
      audit_log_retention_days: 90
      audit_max_log_file: 100

filesystem:
  tmp:
    type: tmpfs
    options: [nodev, nosuid, noexec]
  home:
    options: [nodev]

controls:
  - id: 1.1.2
    override: compliant
    reason: "tmpfs /tmp implemented via systemd unit — equivalent control"
  - id: 5.2.4
    override: compliant
    reason: "SSH timeout managed by session manager policy, not sshd_config"

Each section is explicit:

target — which OS, which version, which provider. This is the only provider-specific section. The compliance intent below it is portable.

compliance — which benchmark and which controls to apply. controls: all means every CIS L1 control. You can also specify controls: [1.x, 2.x] to scope to specific sections.

hardening — which Ansible roles to run. ansible-lockdown/UBUNTU22-CIS is the community CIS hardening role. You can add custom roles alongside it.

controls — documented exceptions. Not suppressions — overrides with a recorded reason. This is the difference between “we turned off this control” and “this control is satisfied by an equivalent implementation, documented here.”


Building the Image

# Validate the blueprint before building
stratum blueprint validate ubuntu22-cis-l1.yaml

# Build — this will take 15-20 minutes
stratum build --blueprint ubuntu22-cis-l1.yaml --provider aws

# Output:
# [15:42:01] Launching build instance...
# [15:42:45] Running ansible-lockdown/UBUNTU22-CIS (144 tasks)...
# [15:51:33] Running custom-audit-logging role...
# [15:52:11] Running post-build OpenSCAP scan (benchmark: cis-l1)...
# [15:54:08] Grade: A (98/100 controls passing)
# [15:54:09] 2 controls overridden (documented in blueprint)
# [15:54:10] Creating AMI snapshot: ami-0a7f3c9e82d1b4c05
# [15:54:47] Done. AMI tagged with compliance grade: cis-l1-A-98

If the post-build scan comes back below a configurable threshold, the build fails — no AMI is created. The instance is terminated. The image does not exist.

That is the structural guarantee. You cannot skip a build step at 2am because at 2am you’re calling stratum build, not running steps manually.


The Control Override Mechanism

The override mechanism is what separates this from checkbox compliance.

Every security benchmark has controls that conflict with how production environments actually work. CIS L1 recommends /tmp on a separate partition. Many cloud instances use tmpfs with equivalent nodev, nosuid, noexec mount options. The intent of the control is satisfied. The literal implementation differs.

Without an override mechanism, you have two bad options: fail the scan (noisy, meaningless), or configure the scanner to ignore the control (undocumented, invisible to auditors).

The blueprint’s controls section gives you a third option: record the override, document the reason, and let the scanner count it as compliant. The SARIF output and the compliance grade both reflect the documented state.

controls:
  - id: 1.1.2
    override: compliant
    reason: "tmpfs /tmp implemented via systemd unit — equivalent control"

This appears in the build log, in the SARIF export, and in the image metadata. An auditor reading the output sees: control 1.1.2 — compliant, documented exception, reason recorded. Not: control 1.1.2 — ignored.


What the Blueprint Gives You That a Script Doesn’t

Hardening script HardeningBlueprint YAML
Version-controlled Possible but not enforced Always — it’s a file
Auditable exceptions Typically not Built-in override mechanism
Post-build verification Manual or none Automatic OpenSCAP scan
Image exists only if hardened No Yes — build fails if scan fails
Multi-cloud portability Requires separate scripts Provider flag, same YAML
Drift detection Not possible Rescan instance against original grade
Skippable at 2am Yes No — you’d have to change the build process

The last row is the one that matters. A script is skippable because there’s a human in the loop. A blueprint is a build artifact — you can’t deploy the image without the blueprint having been applied, because the image is what the blueprint produces.


Validating a Blueprint Before Building

# Syntax and schema validation
stratum blueprint validate ubuntu22-cis-l1.yaml

# Dry-run — show what Ansible tasks will run, what controls will be checked
stratum build --blueprint ubuntu22-cis-l1.yaml --provider aws --dry-run

# Show all available controls for a benchmark
stratum blueprint controls --benchmark cis-l1 --os ubuntu --version 22.04

# Show what a specific control checks
stratum blueprint controls --id 1.1.2 --benchmark cis-l1

The dry-run output shows every Ansible task that will run, every OpenSCAP check that will fire, and flags any controls that might conflict with the provider environment before you’ve launched a build instance.


Production Gotchas

Build time is 15–25 minutes. Ansible-Lockdown applies 144+ tasks for CIS L1. Build this into your pipeline timing — don’t expect golden images in 3 minutes.

Cloud-init ordering matters. On AWS, certain hardening steps (sysctl tuning, PAM configuration) interact with cloud-init. The Stratum provider layer handles sequencing — but if you add custom hardening roles, test the cloud-init interaction explicitly.

Some CIS controls conflict with managed service requirements. AWS Systems Manager Session Manager requires specific SSH configuration. RDS requires specific networking settings. Use the controls override section to document these — don’t suppress them silently.

Kernel parameter hardening requires a reboot. Controls in the 3.x (network parameters) and 1.5.x (kernel modules) sections apply sysctl changes that take effect on reboot. The Stratum build process reboots the instance before the OpenSCAP scan — don’t skip the reboot if you’re building manually.


Key Takeaways

  • Linux hardening as code means the blueprint YAML is the build artifact — the image either exists and is hardened, or it doesn’t exist
  • The controls override mechanism is the difference between undocumented suppressions and auditable, reasoned exceptions
  • Post-build OpenSCAP scan runs automatically — a failing grade blocks image creation
  • One blueprint file is portable across providers (EP03 covers this): the compliance intent stays in the YAML, the cloud-specific details go in the provider layer
  • Version-controlling the blueprint gives you a complete history of what your OS security posture was at any point in time — the same way Terraform state tracks infrastructure

What’s Next

One blueprint, one provider. EP02 showed that the skip-at-2am problem is solved when hardening is a build artifact rather than a process step.

What it didn’t address: what happens when you expand to a second cloud. GCP uses different disk names. Azure cloud-init fires in a different order. The AWS metadata endpoint IP is different from every other provider. If you maintain separate hardening scripts per cloud, they drift within a month.

EP03 covers multi-cloud OS hardening: the same blueprint, six providers, no drift.

Next: multi-cloud OS hardening — one blueprint for AWS, GCP, and Azure

Get EP03 in your inbox when it publishes → linuxcent.com/subscribe
BPF Verifier Explained: Why eBPF Is Safe for Production Kubernetes

Reading Time: 10 minutes


Reading Time: 9 minutes

~2,400 words · Reading time: 9 min · Series: eBPF: From Kernel to Cloud, Episode 2 of 18

In Episode 1, we established what eBPF is and why it gives Linux admins and DevOps engineers kernel-level visibility without sidecars or code changes. The obvious follow-up question is the one every experienced engineer should ask before running anything in kernel space:

Is it actually safe to run on production nodes?

The answer is yes — and the reason is one specific component of the Linux kernel called the BPF verifier. This post explains what the verifier is, what it protects your cluster from, and why it changes the risk calculus for eBPF-based tools entirely.


Architecture Overview

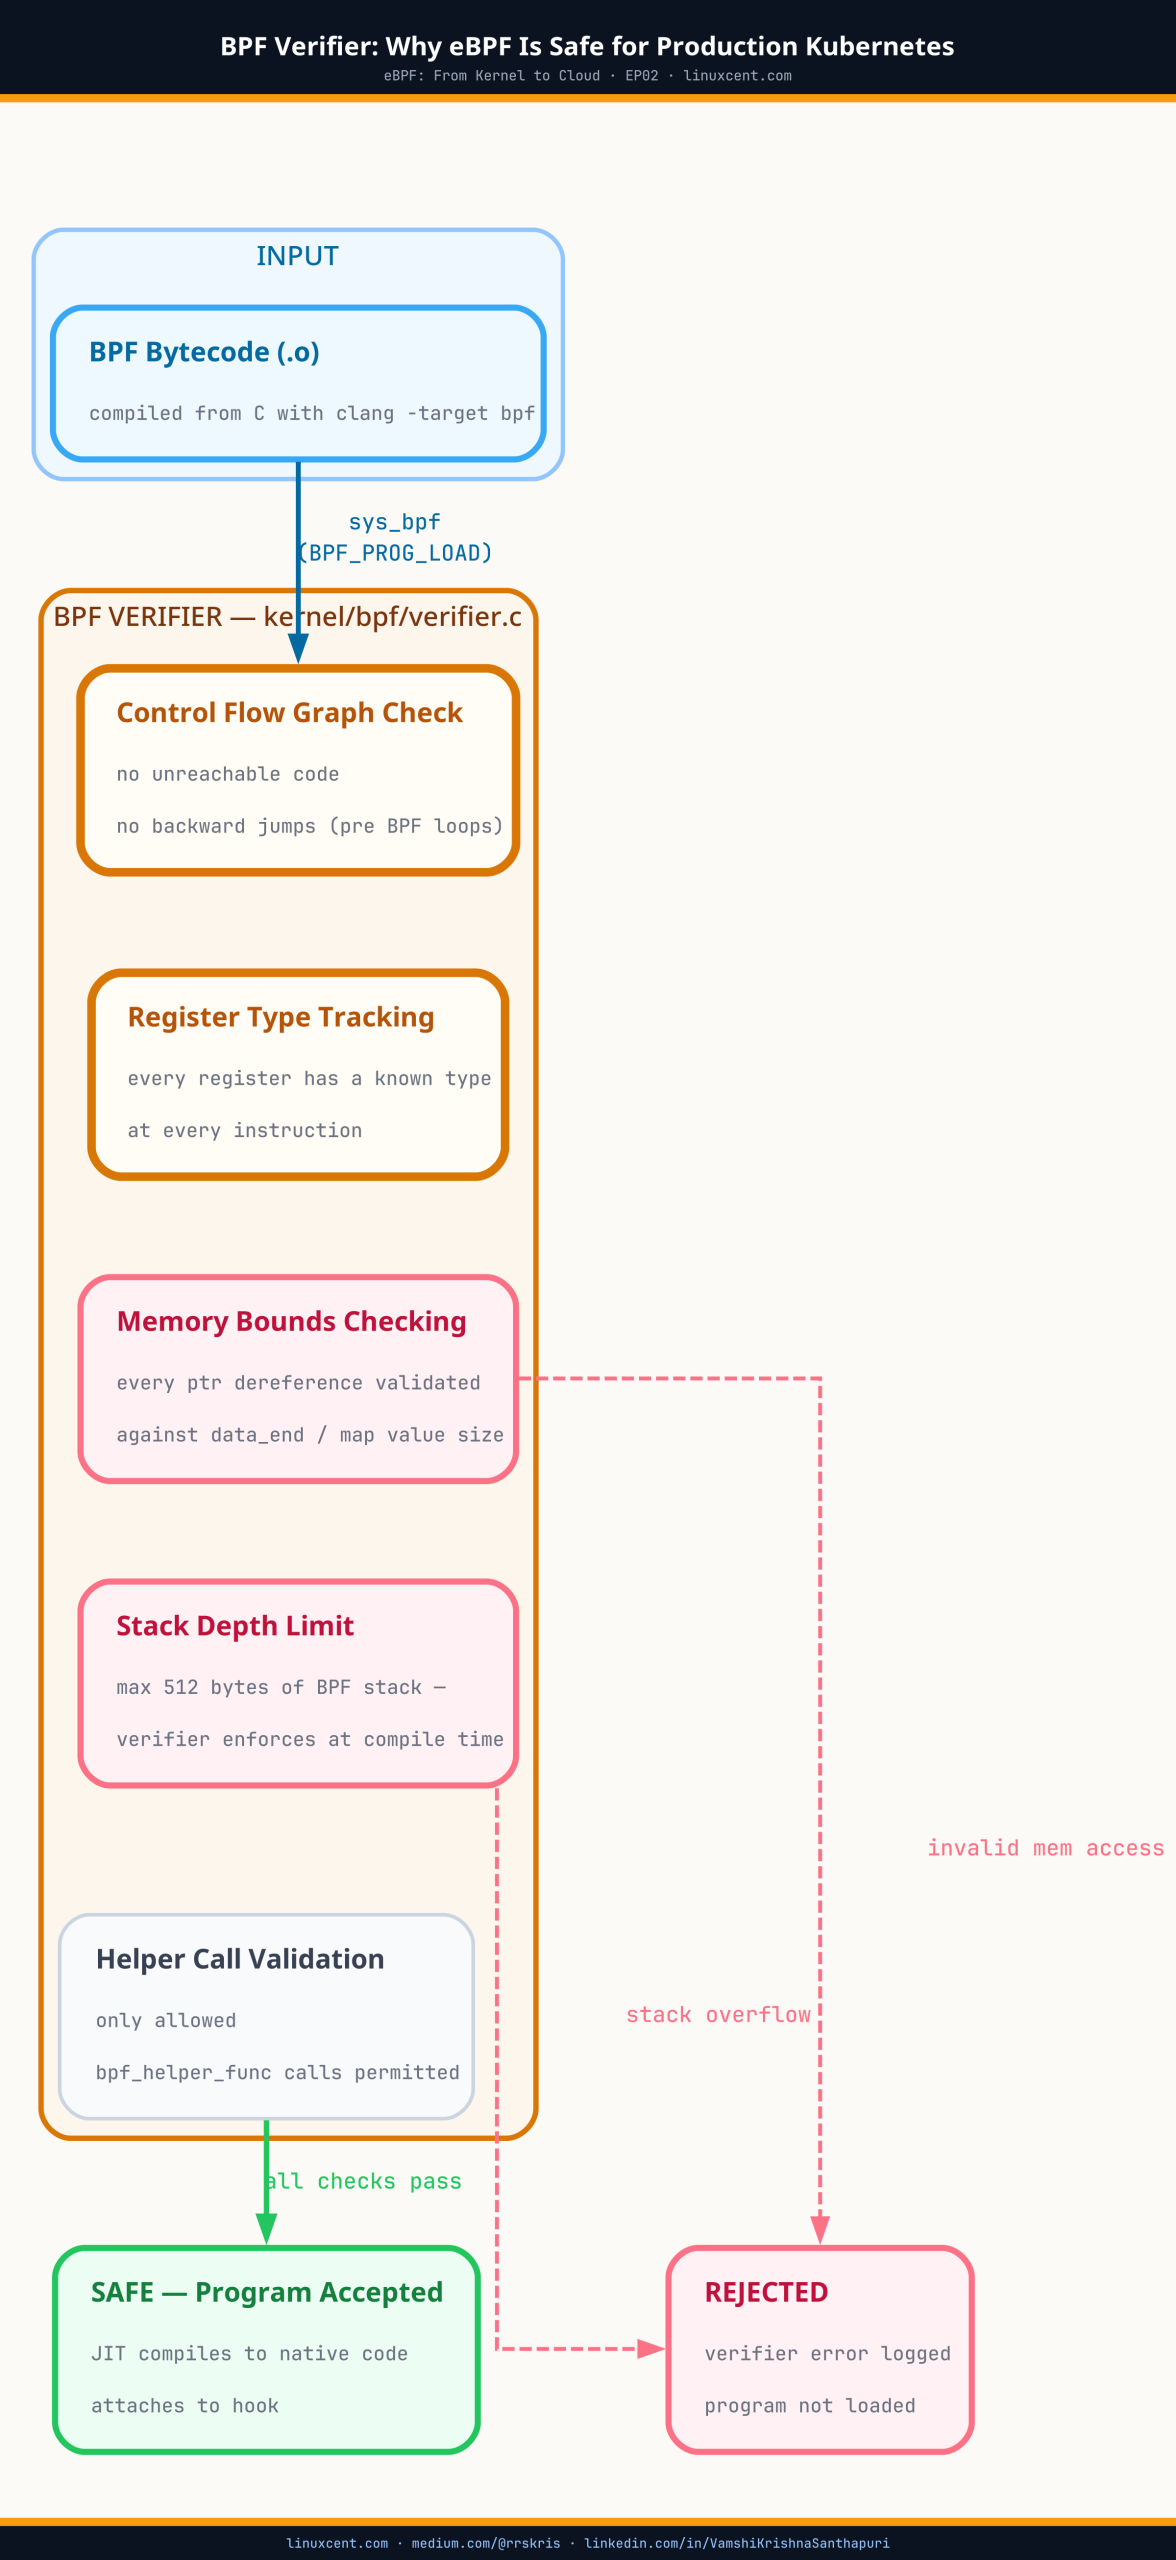
BPF Verifier and JIT pipeline — how eBPF programs are safety-checked and compiled before kernel execution
The BPF verifier runs before every eBPF load — rejecting unsafe programs before they touch the kernel.

TL;DR

  • The BPF verifier is a static analysis pass that runs before every eBPF program loads — it rejects unsafe programs before they touch the kernel
  • It prevents infinite loops (only bounded loops allowed), out-of-bounds memory access, null pointer dereferences, and privilege escalation via kernel pointer leaks
  • Unlike kernel modules, a verified eBPF program cannot kernel-panic your node — that guarantee is why eBPF-based tools are safe in production
  • Every eBPF-based tool you run — Cilium, Falco, Tetragon, Datadog — passes its programs through the verifier on every node load
  • Ask three questions before adopting any eBPF tool: minimum kernel version required, CO-RE support (portable across kernels), and which program types it uses
  • (The verifier is also why eBPF programs require CAP_BPF or CAP_SYS_ADMIN — privilege is still required to load, just not to survive a bad load)

The Fear That Holds Most Teams Back

When I first explain eBPF to Linux admins and DevOps engineers, the reaction is almost always the same:

“So it runs code inside the kernel? On our production nodes? That sounds like a disaster waiting to happen.”

It is a completely reasonable concern. The Linux kernel is not a place where mistakes are tolerated. A buggy kernel module can take down a server instantly — no warning, no graceful shutdown, just a hard panic and a 3 AM phone call.

I know this from personal experience. During 2012–2014, I worked briefly with Linux device driver code. That period taught me one thing clearly: kernel space does not forgive careless code.

So when people started talking about running programs inside the kernel via eBPF, my instinct was scepticism too. Then I understood the BPF verifier. And everything changed.


What the Verifier Actually Is

Think of the BPF verifier as a strict safety gate that sits between your eBPF program and the kernel. Before your eBPF program is allowed to run — before it touches a single system call, network packet, or container event — the verifier reads through every line of it and asks one question:

“Could this program crash or compromise the kernel?”

If the answer is yes, or even maybe, the program is rejected. It does not load. Your cluster stays safe. If the answer is a provable no, the program loads and runs.

This is not a runtime check that catches problems after the fact. It is a load-time guarantee — the kernel proves the program is safe before it ever executes. Here is what that looks like when you deploy Cilium:

You run: kubectl apply -f cilium-daemonset.yaml
         └─► Cilium loads its eBPF programs onto each node
                   └─► Kernel verifier checks every program
                             ├─► SAFE   → program loads, starts observing
                             └─► UNSAFE → rejected, cluster untouched

This is why Cilium can replace kube-proxy on your nodes, why Falco can watch every syscall in every container, and why Tetragon can enforce security policy at the kernel level — all without putting your cluster at risk.


What the Verifier Protects You From

You do not need to know how the verifier works internally. What matters is what it prevents — and why each protection matters specifically in Kubernetes environments.

Infinite loops

An eBPF program that never terminates would freeze the kernel event it is attached to — potentially hanging every container on that node. The verifier rejects any program it cannot prove will finish executing within a bounded number of instructions.

Why this matters: Every eBPF-based tool on your K8s nodes — Cilium, Falco, Tetragon, Hubble — was verified to terminate correctly on every code path before it shipped. You are not trusting the vendor’s claim. The kernel enforced it.

Memory safety violations

An eBPF program cannot read or write memory outside the boundaries it is explicitly granted. No reaching into another container’s memory space. No accessing kernel data structures it was not given permission to touch.

Why this matters: This is the property that makes eBPF safe for multi-tenant clusters. A Falco rule monitoring one namespace cannot accidentally read data from another namespace’s containers. The verifier makes this impossible at the program level, not just at the policy level.

Kernel crashes

The verifier checks that every pointer is valid before it is dereferenced, that every function call uses correct arguments, and that the program cannot corrupt kernel data structures. Programs that could cause a kernel panic are rejected before they load.

Why this matters: Running Cilium or Tetragon on a production node is not the same risk as loading an untested kernel module. The verifier has already proven these programs cannot crash your nodes — before they ever ran on your infrastructure.

Privilege escalation and kernel pointer leaks

eBPF programs cannot leak kernel memory addresses to userspace. This closes a class of container escape and privilege escalation attacks that have historically been possible through kernel module vulnerabilities.

Why this matters: Security tools built on eBPF — like Tetragon, which detects and blocks container escape attempts in real time — are not themselves a vector for the attacks they protect against.


eBPF vs Traditional Observability Agents

To appreciate what the verifier gives you operationally, compare the two main approaches to K8s observability.

Traditional agent — DaemonSet sidecar approach

Your K8s cluster
└─► Node
    ├─► App Pod (your service)
    ├─► Sidecar container (injected into every pod)
    │   └─► Reads /proc, intercepts syscalls via ptrace
    │       └─► 15–30% CPU/memory overhead per pod
    └─► Agent DaemonSet Pod
        └─► Aggregates data from all sidecars

Problems with this model:

  • Sidecar injection requires modifying every pod spec and typically an admission webhook
  • ptrace-based interception adds 50–100% overhead to the traced process and is blocked in hardened containers
  • The agent runs in userspace with elevated privileges — a larger attack surface
  • Updating the agent requires pod restarts across your fleet

eBPF-based tool — Cilium / Falco / Tetragon

Your K8s cluster
└─► Node
    ├─► App Pod (your service — completely unmodified)
    ├─► App Pod (another service — also unmodified)
    └─► eBPF programs (inside the kernel, verifier-checked)
        └─► See every syscall, network packet, file access
            └─► Forward events to userspace agent via ring buffer

Benefits:

  • No sidecar injection — pod specs stay clean, no admission webhook required
  • Kernel-level visibility with near-zero overhead (typically 1–3%)
  • The verifier guarantees the eBPF programs cannot harm your nodes
  • Works identically with Docker, containerd, and CRI-O

Tools You Are Probably Already Running — All Verifier-Protected

You may already be running eBPF on your nodes without thinking about it explicitly. In each case below, the verifier ran before the tool ever touched your cluster.

Tool How the verifier is involved
Cilium Every network policy decision, service load-balancing operation, and Hubble flow log is handled by eBPF programs that passed the verifier at node startup.
Falco Every Falco rule is enforced by a verifier-checked eBPF program attached to syscall hooks. Sub-millisecond detection is only possible because the program runs in kernel space.
AWS VPC CNI On EKS, networking operations have progressively moved to eBPF for performance at scale. If you are on a recent EKS AMI, eBPF is already doing work on your nodes.
systemd Modern systemd uses eBPF for cgroup-based resource accounting and network traffic control. Active on most current Ubuntu, RHEL, and Amazon Linux 2023 installations.

Questions to Ask When Evaluating eBPF Tools

When a vendor tells you their tool uses eBPF, these three questions will quickly tell you how mature their implementation is.

1. What kernel version do you require?

The verifier’s capabilities have expanded significantly across kernel versions. Tools targeting kernel 5.8+ can use more powerful features safely. Tools claiming to work on kernel 4.x are constrained by an older, more limited verifier. The table below shows exactly where each major distribution stands.

Distribution Default kernel eBPF support level Notes
Ubuntu 16.04 LTS 4.4 Basic eBPF only No BTF. kprobes and socket filters work but modern tooling like Cilium and Falco eBPF driver will not run. EOL — do not use for new deployments.
Ubuntu 18.04 LTS 4.15 eBPF, no BTF No CO-RE. Tools must be compiled against the exact running kernel headers. The HWE kernel (5.4) improves this but BTF still varies by build.
Ubuntu 20.04 LTS 5.4 BTF available, verify before use CO-RE capable on most deployments. CONFIG_DEBUG_INFO_BTF was absent on some early builds. Verify with ls /sys/kernel/btf/vmlinux before deploying eBPF tooling. Cloud images generally have it enabled.
Ubuntu 20.10+ 5.8 Full BTF + CO-RE First Ubuntu release where BTF was consistently enabled by default. Ring buffers available. Not an LTS release — use 22.04 for production.
Ubuntu 22.04 LTS 5.15 Full modern eBPF — production ready BTF embedded. Ring buffers, global variables, LSM hooks. Default baseline for EKS-optimised Ubuntu AMIs. Recommended for new deployments.
Ubuntu 24.04 LTS 6.8 Full modern eBPF + latest features Open-coded iterators, improved verifier precision, enhanced LSM support. Best Ubuntu option for cutting-edge eBPF tooling today.
Debian 10 (Buster) 4.19 Basic eBPF, no BTF eBPF programs load but CO-RE is unavailable. Must compile against exact kernel headers. EOL — migrate to Debian 11 or 12.
Debian 11 (Bullseye) 5.10 LTS Full BTF + CO-RE BTF enabled. CO-RE works. Cilium, Falco, and Tetragon all fully supported. Solid production baseline for Debian environments through 2026.
Debian 12 (Bookworm) 6.1 LTS Full modern eBPF — production ready Same kernel generation as Amazon Linux 2023. LSM hooks, ring buffers, full CO-RE. Recommended Debian version for eBPF workloads today.
Debian 13 (Trixie) 6.12 LTS Full modern eBPF + latest features Released August 2025. Same kernel generation as RHEL 10 / Rocky 10 / AlmaLinux 10. Maximum eBPF feature availability across all program types.
RHEL 7.6 3.10 (backported) Tech Preview only — not production safe First RHEL release to enable eBPF but explicitly marked as Tech Preview. Limited to kprobes and tracepoints. No XDP, no socket filters, no BTF. Do not use for eBPF in production.
RHEL 8 / Rocky 8 / AlmaLinux 8 4.18 (heavily backported) Full BPF + BTF — functionally 5.4-equivalent Red Hat backports make RHEL 8 kernels functionally comparable to upstream 5.4 for most eBPF use cases. BTF enabled across all releases. CO-RE works. Cilium treats RHEL 8.6+ as its minimum supported RHEL-family version.
RHEL 9 / Rocky 9 / AlmaLinux 9 5.14 (heavily backported) Full modern eBPF — production ready BTF embedded. XDP, tc, kprobe, tracepoint, and LSM hooks all supported. Falco, Cilium, and Tetragon fully supported. Recommended RHEL-family version for eBPF deployments today. Supported until 2032.
RHEL 10 / Rocky 10 / AlmaLinux 10 6.12 Full modern eBPF + latest features Same kernel generation as Debian 13 and upstream 6.12 LTS. Rocky 10 released June 2025, AlmaLinux 10 released May 2025. Enhanced eBPF functionality throughout.
Amazon Linux 2023 6.1+ Full modern eBPF — production ready BTF embedded. Full CO-RE. Recommended for EKS. Also resolves the NetworkManager deprecation issues in EKS 1.33+ — see the EKS 1.33 post.

Quick check for any distro: Run ls /sys/kernel/btf/vmlinux on your node. If the file exists, your kernel has BTF enabled and CO-RE-based eBPF tools will work correctly. If it does not exist, you are limited to tools that compile against your specific kernel headers. Run uname -r to confirm the exact kernel version.

Rocky Linux and AlmaLinux note: Both distros rebuild directly from RHEL sources. Their kernel versions and eBPF capabilities are effectively identical to the corresponding RHEL release. When Cilium or Falco document “RHEL 9 support”, that applies equally to Rocky 9 and AlmaLinux 9 without any additional configuration.

2. Do you use CO-RE?

CO-RE (Compile Once, Run Everywhere) means the tool’s eBPF programs work correctly across different kernel versions without recompilation. Tools using CO-RE are more portable and significantly less likely to break after a routine node OS update. This is a reliable signal of engineering maturity in the vendor’s eBPF implementation.

3. What eBPF program types do you use?

Different program types have different privilege levels and access scopes. A tool that only needs kprobe access is asking for considerably less privilege than one requiring lsm hooks.

  • kprobe / tracepoint — observability and debugging
  • tc (traffic control) — network policy enforcement
  • xdp (eXpress Data Path) — high-performance packet processing
  • lsm (Linux Security Module) — security policy enforcement (used by Tetragon)

Understanding the program type tells you what the tool can and cannot see on your nodes, and how much kernel access you are granting it.


How Falco Uses the Verifier — A Step-by-Step Walkthrough

Here is exactly what happens when Falco starts on one of your K8s nodes, and where the verifier fits in:

1. Falco pod starts on the node (via DaemonSet)

2. Falco loads its eBPF programs into the kernel:
   └─► BPF verifier checks each program
       ├─► Can it crash the kernel?            No → continue
       ├─► Can it loop forever?                No → continue
       ├─► Can it access out-of-bounds memory? No → continue
       └─► PASS → program loads

3. Falco's eBPF programs attach to syscall hooks:
   └─► sys_enter_execve   (every process execution in every container)
   └─► sys_enter_openat   (every file open)
   └─► sys_enter_connect  (every outbound network connection)

4. A container runs an unexpected shell (potential attack):
   └─► execve() called inside the container
   └─► Falco's eBPF hook fires in kernel space
   └─► Event forwarded to Falco userspace via ring buffer
   └─► Falco rule matches: "shell spawned in container"
   └─► Alert fired in under 1 millisecond

5. Your container, your other pods, your node: completely unaffected

Step 2 is what the verifier makes safe. Without it, attaching eBPF hooks to every syscall on your production node would be an unacceptable risk. With it, Falco can offer this level of visibility with a mathematical safety guarantee.


The Bottom Line

You do not need to understand BPF bytecode, register states, or static analysis to use eBPF tools safely in production. What you do need to understand is this:

The BPF verifier is the reason eBPF is fundamentally different from kernel modules. It does not just make eBPF “safer” in a vague sense — it provides a mathematical proof that each program cannot crash your kernel before that program ever runs.

This is why eBPF-based tools can deliver deep kernel-level visibility into every container, every syscall, and every network flow — with near-zero overhead, no sidecar injection, and production safety that kernel modules could never guarantee.

The next time someone on your team hesitates about running Cilium, Falco, or Tetragon on production nodes because “it runs code in the kernel” — you now know what to tell them. The verifier already checked it. Before it ever touched your cluster.


Further Reading


Questions or corrections? Reach me on LinkedIn. If this was useful, the full series index is on linuxcent.com — search the eBPF Series tag for all episodes.